The Human Body
The Human Body
Anatomy Lesson 24
In this video lesson, you will discover how to draw the human body in realistic manner.
The Human Body Anatomy for Figurative Artists
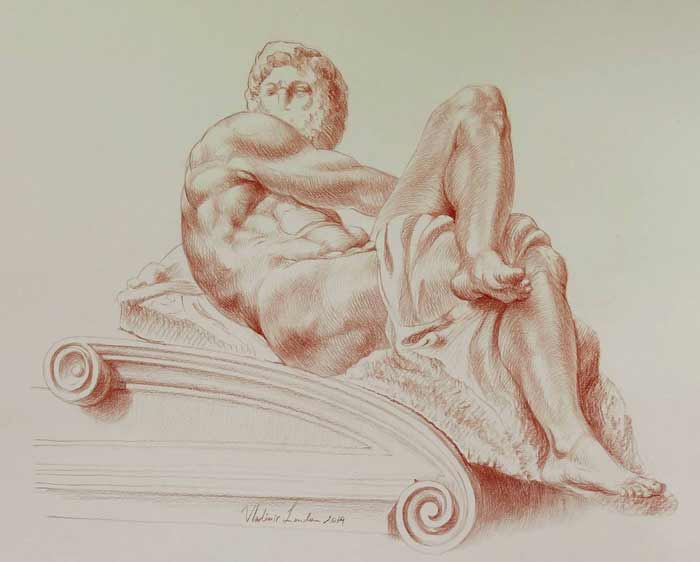
The model for this drawing will be a marble sculpture depicting an anthropomorphized Day, which is part of the Medici tomb decoration. Together with the figure of Night, it was carved by the famous sculptor Michelangelo Buonarroti.
The drawing of the human body begins with marking the outmost edges of the figure. To measure the relative positions of these marks, I use the angular method. Angles can be measured first on the model and then in the drawing using a pencil to indicate the degree of tilt.
You can also measure the relative proportions between prominent points by comparing how many times the distance between two points fits into the larger distance between another two points.
This method can be also used for other non-figurative works, like when you are drawing a still-life or a landscape.
Because this figure has a complicated pose and is seen in perspective, this method is used to build the correct proportions of the human body. It works well when you have a model in front of you, which you can measure with a pencil.
This method is the part of the constructive drawing principles, which are not included in the scope of the anatomy course.
I explain in detail how to measure angles and proportions using a pencil in the Drawing Academy. You can enroll in the Drawing Academy course to learn more about constructive drawing principles.
I will mention some muscles, knowledge of which will help you to draw the human body with confidence.
At the top, the deltoid muscle defines the upper edge of the shoulder.
The muscles that originate from the shoulder blade create another arched curve that create the outline of the upper back.
The rear of the upper arm is occupied by the triceps brachii muscle.
The upper edge of the widest muscle of the back inserts in to the upper arm bone.
The abdominal side of the torso features the well-developed six-pack muscle.
The calf muscle gives the upper half of the lower leg its characteristic shape.
There are many more muscles you need to know to depict realistically the human body. To learn more about those muscles, you can enroll in the Anatomy Master Class.
It is time to reveal the human body three dimensional nature by rendering tonal values.
The best way to do shading is by starting from the darkest areas of the piece and moving towards the lighter areas.
You should also move your pencil strokes along the surface contours while you are rendering.
Contours are imaginary lines that characterize the shape and volume of the object. Hatching along these lines helps to reveal the three-dimensional nature of the subject in your drawing’s two-dimensional surface.
You should make your pencil strokes in various directions.
Although it is possible to make a tonal drawing with strokes only going in a single direction, it will look more attractive and interesting when you use a wider gamut of pencil strokes.
I have seen some artists who render shades in a uniform direction, moving the pencil diagonally from the top right to the bottom left. This type of shading looks very mechanical and lacks expressiveness.
Gamut is the variety of pencil marks. These can be made in a variety of directions, for example, vertically, horizontally, and diagonally, as well as in combinations of straight and curved lines, short and long lines, parallel and cross-hatched lines, and so on.
A proficient artist must know how to use the drawing tool at hand and how to render in a wide gamut with it.
In the Drawing Academy course, I dedicate a great deal of attention to traditional rendering techniques and thus have made a special video lesson that shows various methods of pencil hatching and the variety of rendering marks.
In drawing, the gamut of the pencil strokes is as important as notes in music. Sound can be made with the repetition of a single note; however, truly beautiful music requires more.
The same applies to drawing in pencil. Every pencil stroke and mark can be thought of as a separate note. The finished piece should contain the beautifully rendered gamut of marks.
On the other hand, you do not have go for a wide gamut of pencil strokes just for the sake of it. No composer puts every note available into one piece of music. Likewise, you also have to use economy in your rendering. The final result should be unified and depict the subject in a realistic manner.
Good rendering has to develop gradually.
When rendering tonal values in graphite pencil, I do not finish any particular area of the drawing before moving to another spot. Instead, I’m working on the whole drawing simultaneously, building up tonal values layer by layer.
The mid-tones on the drawing appear only after I touch up the dark areas; the light tones appear only after the middle tones. This way, I have complete control over how the tonal values of the whole piece are rendered.
There is one common mistake you have to avoid when rendering tonal values. Do not start from one corner of the drawing and render fully as they work to the other corner. This technique only works when you do a drawing in pen and ink; however, it is not applicable when you draw from life in graphite or colored pencil.
I have seen videos where amateur artists render tonal values to the fullest strength their drawing tool can provide as soon as they start. This is another mistake to avoid. This method can exhaust your drawing tool’s strength before you reach the required contrast between light and dark areas, leaving very little control over how tonal values are developed. This may be used when copying from a photo, but it is not what we recommend here.
When rendering tonal values in layers, dark tones become lighter when compared to the middle tones. So, I will return and deepen the dark tones to maintain contrast.
The same process repeats when middle half-tones become relatively lighter; I will go back and render them darker. This gives you huge flexibility when evaluating the difference in tones, allowing you to deepen values when necessary.
This way, the progress on the drawing in colored pencil is very methodical. The whole artwork develops gradually and looks complete at all times. If you can stop working on tonal values at any time and the drawing looks complete (even if not wholly finished), you are rendering correctly.
I hope you have learnt a thing or two not only about anatomy but also about some drawing techniques and rendering methods. However, these only touches the surface of what a proficient artist is required to know…
To discover how to draw proficiently whatever you see, think, or imagine, you can enroll in the Drawing Academy course.
[ The full lesson is avaibale to Anatomy Master Class members ]
To learn more about the Human Body anatomy, enroll in the Anatomy Master Class
Simple Pricing, No Surprises
One-time payment - Only $97 USD
ENROLL NOW