How to Draw a Realistic Face
How to Draw a Realistic Face
Anatomy Lesson 18 – Part 3
In this video lesson, you will discover how to draw a realistic face.
How to Draw a Realistic Face for Portrait Artists
I will demonstrate step-by-step how to draw a realistic face with the necessary knowledge of human anatomy.
First, I mark the outmost top and bottom and left and right edges of the head. This is to ensure that the scale of the portrait will be similar to the previous drawing.
I mark an ellipse, which is the base of the neck. It is, in fact, has a circular shape, but in perspective, it appears as an ellipse.
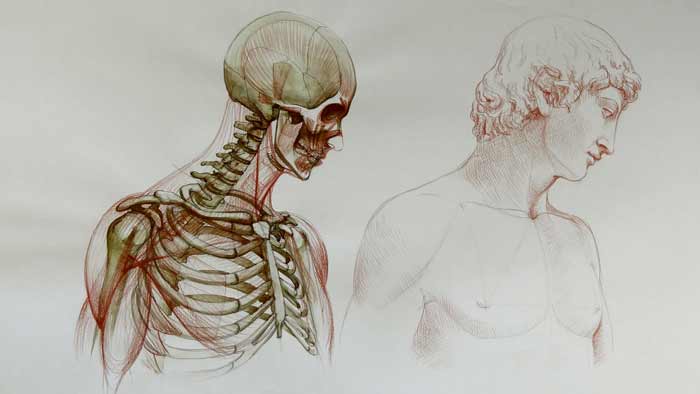
The base of the neck coincides with the first pair of ribs, which is not horizontal, but tilted at about 15-degree angle. That is why this ellipse is also has a downward slope.
The outline of the back of the neck follows the trapezium muscle (the top portion of which covers the rear side of the neck).
The deltoid muscle gives us the outline of the shoulder. Below this muscle, the outline follows the triceps brachii.
The collarbone spans horizontally from the pit of the neck to the acromion of the shoulder blade. This bone is an important landmark in our portrait.
From the pit of the neck, I mark a vertical virtual line in the middle of the chest. The abdominal portion of the chest muscle travels upward while the collarbone portion of the chest muscle is pointing downward. The cross between portions of the chest muscle happens near the armpit.
Here is one important proportion you need to remember when drawing a chest. The height of the breastbone is equal to the length of the collarbone, which, in turn, is equal to the height of the face.
The diagonal line, from the neck pit to the nipple, is at the same angle as the line from another nipple to the edge of the shoulder. Such diagonal line is also parallel to the frontal edge of the deltoid muscle.
Of course, this rule works for anatomy of a male model. The neck muscle is also an important landmark in our drawing. The sternal portion of this muscle goes from the top of the breastbone to the base of the skull, just behind the ear.
Measuring the length of this muscle, we can define the bottom edge of the ear.
The distance between this mark and the bottom edge of the chin is the same as the distance between the base of the nose and the eyebrows. It helps us to place the nose in its proper position.
Here is the proportion to draw the mouth in correct place. The distance between the base of the nose and the line between lips is twice smaller than the distance between lips and the bottom edge of the chin.
According to classical proportions, the upper lip is protruding further than the lower one.
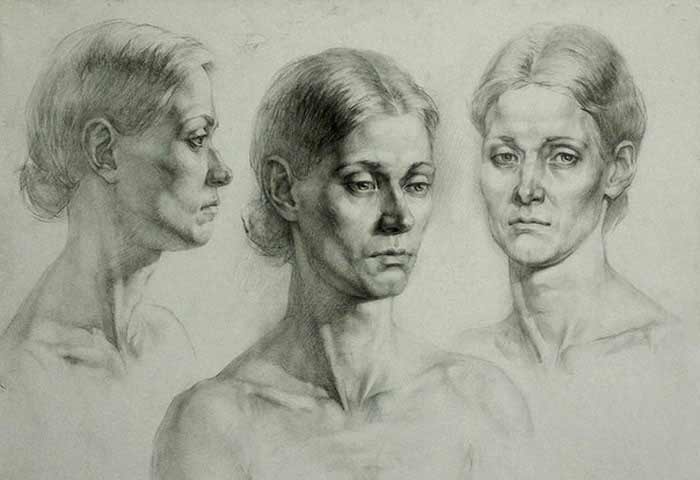
The horizontal line of the eyes is dividing the height of the head in two equal halves.
The eye is essentially a ball, which sits inside the eye socket with eyelids and the round eye muscle wrapping around it.
The upper eyelid is slightly longer than the lower one.
The correct position of the eye is located exactly halfway from the top to the bottom of the head.
The top edge of the ear is positioned on the same level as the line of eyebrows.
The vertical axis of the ear is not strictly vertical, but is slightly tilted backward.
The ear’s outline resembles the character “C.” The ear’s outline is defined by its outer rim, which is called the helix. The inner rim, or anti-helix, resembles an arched character “Y” with two hands pointing upwards. The earlobe occupies approximately one-third of the ear height. The ear hole is protected by the tragus.
When drawing a portrait in profile, you can use the following proportion to locate the ear correctly. The distance from the chin line to the nose line is the same as between the outer corner of the eye and the ear.
Here is another proportion. The angle of the jawbone is on the same level as the line between lips.
When drawing a portrait in profile, or a three-quarter view, keep in mind that the ear channel is located just above the first vertebra of the spinal column.
I will explain why this fact is quite important for you as a fine artist.
The first vertebra is called the atlas. Together, with the base of the skull, it forms the joint between the neck and the head.
At this joint, the head is rotating up and down.
Because the ear channel is positioned very close to this joint, it can be used as the axis around which head is rotating.
You can do the following experiment. Stand in front of the mirror and put two index fingers in your ear holes. I know it looks funny. Now, let’s rotate the head up and down. You can notice that your fingers are staying in the same position, so it is the axis of the head.
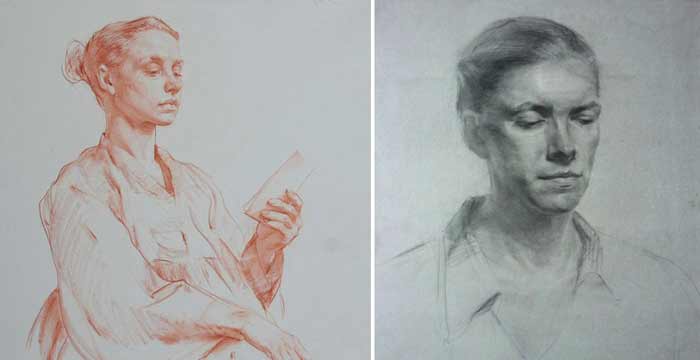
You may ask how to use this information for a portrait drawing. When drawing a head, in a tilted position, as we have right now when head is looking slightly downward, you need to make sure that the level of the eyebrows is lower than the top edge of the ear.
The opposite is also true. When head is looking upward, the level of eyebrows will be higher than the top edge of the ear. The same goes for levels of the nose line and the bottom edge of the ear.
Of course, when the head is looking straight forward, the top edge of the ear and the eyebrows will be on the same horizontal level. I hope you have learned a thing or two about the anatomy of a human head, neck, shoulders, and the upper torso…
[ The full lesson is avaibale to Anatomy Master Class members ]
To learn more about how to draw a realistic face, enroll in the Anatomy Master Class
Simple Pricing, No Surprises
One-time payment - Only $97 USD
ENROLL NOW