How to draw figures in perspective
Question from Jack, Anatomy Master Class student
Is there an absolute method to map a rectangle of given proportions in perspective? Or does this involve some approximations by eye?
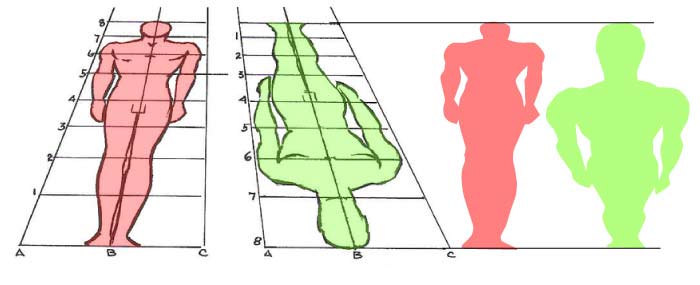
This question come up as I am going through Andrew Loomis’ book “figure drawing for all its worth” and have become stuck on a section about perspective (please see the image below).
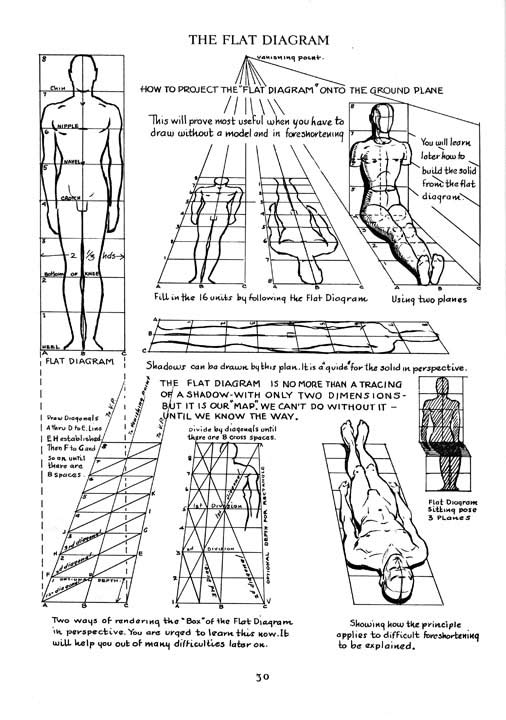
The idea he is trying to teach is how to get the flat diagram of human proportions (8 x 2.33 heads) in perspective.
In the bottom left of the page he shows a method for laying the flat diagram in perspective. I get that the base of the diagram is 2.3 heads and that the diagonals can be used to divide the rectangle into 8 sections in perspective. However, I do not understand the method for determining the height of the figure in perspective as it seems that the diagonals or depth of the rectangles could be set to any height (which would make them incorrect).
I hope you are able to help,
Thanks,
Jack
Feedback from Vladimir London, Anatomy Master Class tutor
Hi Jack, many thanks for your interesting questions.
You can check out these two articles that describe how to draw a square in perspective:
https://drawingacademy.com/how-to-draw-a-square-in-perspective
https://drawingacademy.com/how-to-determine-horizontal-spacing-in-perspective
Regarding “The Flat Diagram” from Andrew Loomis’ book, it follows the rules of linear perspective and shows how the foreshortening works.
However, artistic drawing is not a process of creating technical diagrams. That is why this illustration from the book is not the best example of how to depict human figures in perspective.
You can see that in one-point perspective the figure in red has very elongated legs and small head, while the green one has a massive upper body.
The human brain interprets what we see differently than what mathematical calculations or the photo-lens of a camera presents.
You need to keep in mind that it is impossible to avoid distortions when drawing three-dimensional objects on a flat surface. The artist’s task is to minimize them.
The Old Masters knew it intuitively. That is why they didn’t follow rules of perspective in every single case. For example, have a look at the painting by Andrea Mantegna.
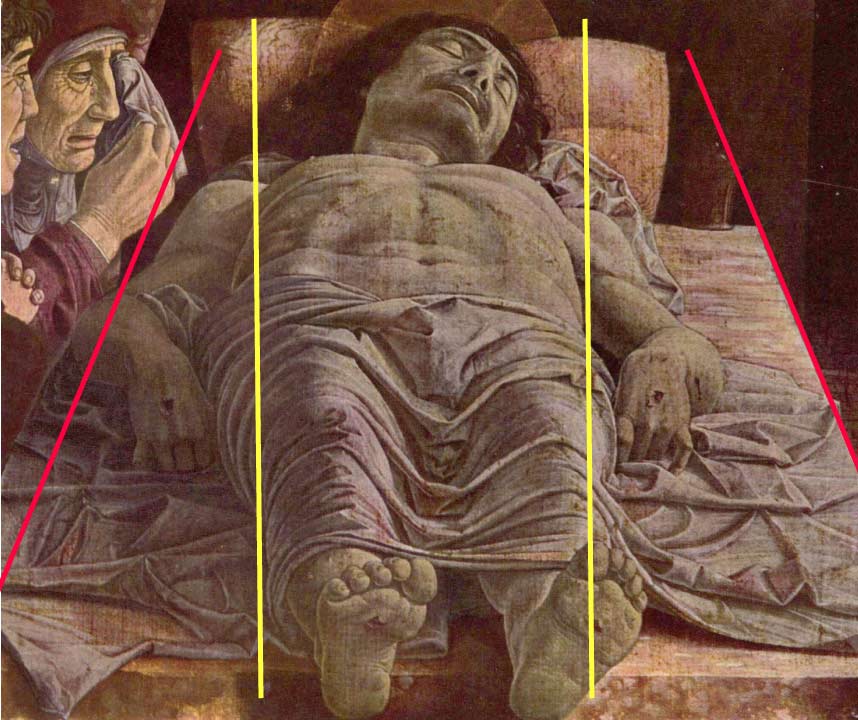
The figure of Christ is depicted in a very difficult angle, as the legs are much closer to the viewer than the head.
The figure is foreshortened, however, the balance between the upper and the lower parts of the body is not distorted. This gives a much better visual picture comparing to the prone figures in Loomis’ diagram.
To avoid such imbalance, Andrea Mantegna used a combination of two kinds of perspective. The figure is depicted in parallel perspective (yellow lines), while the support is in one-point perspective (red lines).
So, an artist has a “creative license” to reinterpret what his eye sees to what his brain knows. For that, you need to study various types of perspective and draw what you know, not what you see. This also applies to copying from photographs – you don’t want to mindlessly copy photo-perspective, but create your own vision of life.
I hope this helps.
Best regards,
Vladimir
Many thanks for your reply Vladimir,
I now feel more at ease in the knowledge that there is no exact formula and more free to explore what feels right.
Kind Regards,
Jack
Learn human body anatomy and proportions quickly and easily
One-time payment - Lifetime Membership
$97 USD